Archive for the ‘Security’ Category
April 4th, 2011
After a decade of abuse, Autorun is finally being retired in older versions of Windows.
Microsoft has finally removed Autorun function from earlier versions of its Windows operating system that has been widely abused by miscreants to surreptitiously install malware on users' computers.
Vista/Windows 7 introduces some new features like UAC and improved AutoPlay (aka Autorun) that disables certain functionality which has been abused by malware (like Conficker). These changes will be backported to down level platforms.
This functionality was made available for Windows XP, Windows Server 2003, Windows Vista and Windows Server 2008 .
Please visit the following KB article for more information and how to download the new updates http://support.microsoft.com/kb/971029 for disabling Autorun abuse.
Previous update http://support.microsoft.com/kb/967715
March 29th, 2011
Want to run a Security Check on your BlackBerry? Click this link in your BlackBerry Browser
February 3rd, 2011
If you just forgot our webmin admin password and failed to logging to your webmin account and after several tries your Webmin blocked your IP you need to follow following steps to reset your webmin admin/root/master password:-
- Login to your box as root.
- If you are running a RedHat distribution (i.e. Fedora, CentOS, Gentoo), enter the following
/usr/libexec/webmin/changepass.pl /etc/webmin username password
If you are running a Debian distribution, enter the following command:
/usr/share/webmin/changepass.pl /etc/webmin username password
-
You are almost done.
- Now you can Login to Webmin with your new password you just reset.
February 3rd, 2011
The root user can change the password for any other user. However what if you forget your root password?
To reset your root password (or any other account’s password for that matter), there are essentially two different situations which require varying approaches
When you can use Boot Loaders (GRUB / LILO)
If you have GRUB installed and you have accesses to edit boot parameters of selected entries then the job is as easy as it can get. Follow along and you shall have root access in no time. Once you have root access you can pretty much do anything you want to do!
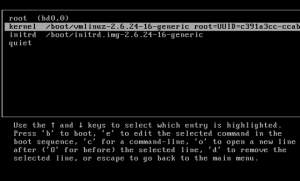
- Highlight the GRUB entry for the Linux installation that you want to reset the password for.
- Press ‘e’ to edit. Select the Kernel line. Add ‘single’ at the end of the kernel line, Press ENTER and then Press ‘b’ to boot. If your system still requires you to enter the root password, add init=/bin/bash at the end. Press ‘b’ to boot.
- Please note in some distros 'single' can be, 'linux single' , 'run level 1' etc.

- Either you would be taken to the root prompt directly or shown the recovery menu from where you can choose the root prompt. Use passwd <username> to change the password for any account.
- Type reboot to reboot the system and then log in in with your new password.
When you can’t use Boot Loaders
If you are unable to use GRUB for whatever reasons (like password protected entries) you can still reset the password using a Live CD (I will be using Ubuntu Live CD, you may use any other). Just follow the steps below to achieve this:
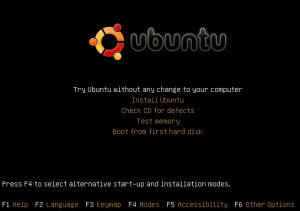
- Boot from the Live CD (Download Link) (Aslo you can try USB drive to boot after downloading .ISO file, try this)
- Choose

“Try Ubuntu without any changes to your computer”
- When the system is ready, fire up a terminal window (CTRL+ALT+F1) and get ready for some command line action
- Type sudo fdisk -l.

In the output we are concerned to know which partition Linux is installed on and what name the hard disk is using. (e.g) in my case it is /dev/sda1 is the required partition. If you are sure about the partition you can skip this step
- Next we need to mount the Linux partition. Create a directory to act as mount point for the partition. Use ‘sudo mkdir /media/masterdrive‘

- Mount the linux partition using the command ‘sudo mount /dev/sda1 /media/masterdrive‘

- Change Root to the mount directory – ‘sudo chroot /media/masterdrive‘

(if no /bin/bash error, then try other partition=> sudo fdisk -l)
- Type sudo passwd and then enter the new password to change the root password.
- OR type password <username> for anyother user
- Type sudo reboot to restart the system.
- You just recovered your root password.
January 26th, 2011
You might heard about Application‐level DDoS (Distributed Denial of Service) attacks on websites such as Twitter, Facebook and Wikileaks. Usually those kind of attacks involves a large number for HTTP/HTTPS requests to specific part of the website that could potentially eat up all the resource of the server resulting unresponsive behavior from the web server.
There are already some tools available to shut down any website and make it unreachable for legitimate users.
Looking at the technique used to perform this attack, the tool sends about 10 Long HTTP/HTTPS requests per second until it reaches bandwidth or connection limits of the hosts or networking equipment to make it offline.
Now the question is how we can stop this attack? What are the preventive measures against the Layer7 DDoS?
First of all, we start limiting the traffic using hashlimit on iptables. This module can be used to allow just a certain number of packets per minute:
iptables -A INPUT -p tcp --dport 80 -m hashlimit --hashlimit-upto 50/min --hashlimit-burst 20 --hashlimit-mode srcip --hashlimit-name http -j ACCEPT
iptables -A INPUT -p tcp --dport 80 -j DROP
where "–hashlimit-burst 20" is the burst limit, you can adjust as per your requirement.
Also using Apache you can add a module mod_reqtimeout. This directive can set various timeouts for receiving the request headers and the request body from the client.
Hope this helps…
December 28th, 2010