Archive for the ‘System Administration’ Category
January 26th, 2013
I was looking for a working script to take full backup (all files+databases+emails) manually or using cron services on my hosting server, each CPanel user by one. But most of the scripts are either old, totally unusable or commercial.
So I wrote one for my own use and sharing here so others don’t need to re-invent the wheel
password_auth($cpanel_account,$cpanel_password);
$xmlapi->set_port('2083');

// Delete any other backup with filetime greater than expire time, before create new backup
$conn_id = ftp_connect($ftphost);
$login_result = ftp_login($conn_id, $ftpacct, $ftppass);

ftp_chdir($conn_id, $logs_dir);
$files = ftp_nlist($conn_id, ".");
foreach ($files as $filename) {
        $fileCreationTime = ftp_mdtm($conn_id, $filename);
        //$date = date("F j, Y, g:i a", ftp_mdtm($conn_id, $filename));
        //print "
Timestamp of '$filename': $date";
        $fileAge=time();
        $fileAge=$fileAge-$fileCreationTime;
        if ($fileAge > $backupexpireindays) { // Is the file older than the given time span?
               //echo "
The file $filename is older than Expire time :$expiretime ...Deleting\n";
               ftp_delete($conn_id, $filename);
               //echo "
Deleted

";
               }
}

ftp_close($conn_id);

$api_args = array(
                           'passiveftp',
                           $ftphost,
                           $ftpacct,
                           $ftppass,
                           $email_notify,
                            21,
                            '/'
                         );

$xmlapi->set_output('json');
print $xmlapi->api1_query($cpanel_account,'Fileman','fullbackup',$api_args);

?>
You need to save it with .php extension (upload it to your server) and download include file from xmlapi.zip(right click->save as) and extract it to the same folder (on your web server). Create cron job from your CPanel or trigger it manually to get full backup in your FTP server, That’s it.
OR
You can fork from my git hub Repositories at cpanel-Fullbackup
Enjoy
January 26th, 2013
Today I had this need to get a list of WHM Accounts using one of its APIs. I have never used it before but it was really simple to use. It returns an xml file that you can manipulate using your prefered language and store it in database for reporting etc.
Here is what you need to do, connect to your server using SSH and run the following command
wget http://your-server-ip:2086/xml-api/listaccts --http-user=myuser --http-password=mypass --output-document=listaccts.xml
Replace your-server-ip with your WHM’s ip and myuser/mypass with the actual WHM/CPanel password. The resultant xml file will be saved as “listaccts.xml” in the same directory as you ran the command in.
If you feel a bit insecure running these command over SSH or don’t have shell access to the server then visit this page on your browser and save it as an xml file.
http://your-server-ip:2086/xml-api/listaccts
(again, substitute your-server-ip with the actual WHM ip address, substitute HTTP with HTTPS and port to 2087 for HTTPS if enabled on your server / FQDN)
Enjoy!
November 8th, 2012
Ever wanted FTP backups and automation for keeping backups of important file on off-peak time. I always love automation, so machines can do things automatically and help humans 🙂 Read the rest of this entry »
October 16th, 2012
Physical access is everything, it is almost impossible to prevent machine access/password break if somebody else got physical access to some Linux machine.
But there are some steps you can make somebody work hard to access the machine physically (provided they have good knowledge of Linux). Read the rest of this entry »
October 15th, 2012
Recently when my servers HDD dead, data center installed a new HDD keeping orginal HDD as secondary so that i can copy data back to new HDD.
I tried to mount the HDD normal way, but got the error:-
[root@server78 ~]# fdisk -l /dev/hda

 Disk /dev/hda: 160.0 GB, 160041885696 bytes
 255 heads, 63 sectors/track, 19457 cylinders
 Units = cylinders of 16065 * 512 = 8225280 bytes

    Device Boot      Start         End      Blocks   Id  System
 /dev/hda1   *           1          13      104391   83  Linux
 /dev/hda2              14       19457   156183930   8e  Linux LVM

 [root@server78 ~]# mount /dev/hda2 /tmp/mnt
 mount: /dev/hda2 already mounted or /tmp/mnt busy
The old drive is lvm. you were trying to mount it like it was an ext3 filesystem. I have listed what i did below so you can see it.
Now we need to check the old disk is using LVM ? type:-
[root@server78 ~]# pvs
PV         VG         Fmt  Attr PSize   PFree
/dev/hda2  VolGroup01 lvm2 a-   148.94G 32.00M
/dev/hdb2  VolGroup00 lvm2 a-   114.94G 96.00M
So now we know our second hard disk VolumeGroup name is “VolGroup00”, now we can mount it like:-
[root@server78 ~]# mount /dev/VolGroup01/LogVol00 /mnt
That’s it, you can see the folders in /mnt/, Edit/copy as you like.
October 12th, 2012
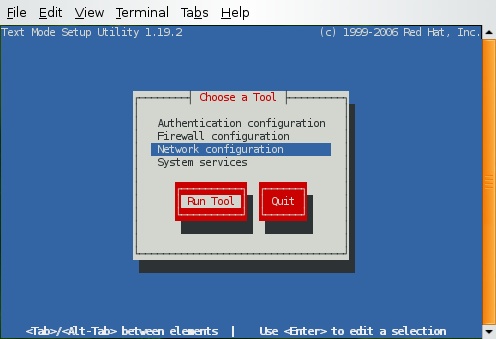
I usually use “setup” to do the firewall setup for permissive or not and setting of SELINUX, etc….
But on a minimal install you don’t have access to setup command, which is my favorite
[root@tel ~]# setup
-bash: setup: command not found
So how to install it in minimal install ?
yum –y install setuptool
yum –y install system-config-network*
yum -y install system-config-firewall*
yum –y install system-config-securitylevel-tui
yum –y install system-config-keyboard
(thanks JoVeN for spell mistake)
For system services utility install ntsysv (as Perico suggested in the user comments)
yum -y install ntsysv
That’s it….!! Enjoy